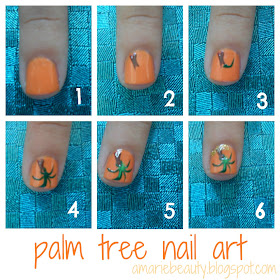
2. Make the trunk by using your brush to make to small lines next to each other. Each line slightly curves away from the other.
3. Add a leaf using a thin brush stoke that tapers off at the end. Fill in with two more leaves on each side and one just off center.
4. Slightly overlap the dark green with a lighter shade near the center of the leaves, not entirely, just to give the leaves two tones.
5. Brush on a coat of glitter at the base of the tree for your sand and you are done.
If you like nail art try this super easy tribal pattern. Look through my entire nail polish tab for other manicure how to's and tips.
The Summer Beauty Series has been fun! See all the DIY's and tips here.


Ahhh!! So cute!! Thanks for the step-by-step!
ReplyDeleteThanks jennie, loved your glitter addition to the gradient mani.
DeleteAdorable! Makes me want to be somewhere tropical!
ReplyDeletevery cute! Great step-by-step!
ReplyDeletehow cute!! you are so talented! mine would never look that good!
ReplyDeleteSooo cute!! I wish I was at the beach ;)
ReplyDeletenow if only we had a beach to go with this heat! its super cute :)
ReplyDeleteI wish I was on the beach too, real palm trees are much better!!! xoxo
ReplyDeleteOh wow - how cute! Thanks for the tutorial :)
ReplyDeleteThis is too cute! I love palm trees!
ReplyDelete